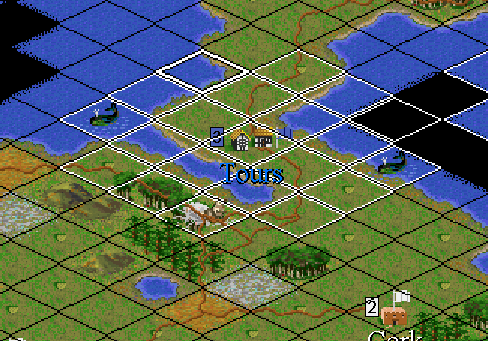
The city of Tours, showing the characteristic Civ2 city radius outlined in white
Civilization 2 was released in 1996 and has consistently ranked among the top computer games of all time ever since. A fairly simple and straightforward model of developing civilizations revealed itself to the player as being incredibly deep and insightful. The cumulative aspect of the turn-based play, in which grand themes emerge from tiny decisions over the course of time, lends the game an addictive quality which has led me to waste thousands of hours on it that could have been used studying real history or whatever. All of this is in spite of AI players that are basically retarded (and have to cheat blatantly to keep up), and dozens of other limitations or flaws in the implementation.
Multiplayer Civ is kickass because it adds a level of statecraft to the game that wasn't possible when playing against the naïve AI player. If we get a six-human game going then there will be a forum somewhere where people can bitch and gripe and send official communiqués to one another in highfaluting diplo-speak. Backstabbing is encouraged.
Civ2 is played on a rectilinear grid which is presented isometrically in the main window. Movement takes place in eight directions (use the numpad on your keyboard); so, consider the squares at each edge and corner to be adjacent to a given square. It is bounded at the north and south by a strip of glacier squares representing poles. Movement east-west is not bounded; therefore topographically the Civ2 world is cylindrical.
Each square is one of several possible terrain types, including plains, ocean, hills, etc. Some squares hold "specials," such as whale, pheasant, etc, and some squares are river squares, and this will all be obvious from studying the map screen. Double-click on a square or access the "Terrain Types" entry in the Civilopedia menu to learn more about each terrain type. Specials appear on the map in a particular pattern and it is often possible to build cities within range of three or four of them (not that it is always wise to do so; sometimes it would be better to have two cities with two each, etc).
Each terrain type can be worked to yield some combination of food, shields, and trade arrows (or just "trade"). Rivers are not a terrain type, but a modifier of the others. "Rivered" squares produce an additional trade arrow, and movement along intercardinally adjacent rivered squares only costs 1/3 of a movement point.
Squares can be improved using the settler unit, and later engineers:
Roads ('r'): Roads reduce the cost of moving between connected squares to 1/3 of a movement point, regardless of the terrain in those squares. It does take longer to build roads in heavier terrain, however. After the discovery of Railroad, roads can be upgraded to railroads. Units expend no movement points travelling between squares connected by railroads. In the "flat" terrain types (grassland, plains, desert), roads cause that square to generate an additional trade arrow. Railroads do this too, and they also increase shield production in a given square by 50%. Roads may not be built in river squares until the discovery of Bridge Building.
Irrigation ('i'): Irrigation causes "flat" squares to produce an additional food. To irrigate a given square, an adjacent square must be ocean, river, or previously irrigated square. "Irrigation" of several other terrain types causes them to be transformed to an arable square, notably you can clear forests into plains, and drain swamps and jungles into grassland. Note that the drainage options take quite a while for a single settler to accomplish. You don't need adjacent water to pull this off. Also, with the advent of Refrigeration, you can improve irrigated squares further to farmland, but to benefit you'll need a Supermarket improvement in the city which is to work the square.
Mines ('m'): Mines increase production in that square by 50% but only some terrain types can support a mine. The most relevant one is the hill. Look through the terrain types in the civilopedia for what mining does to other kinds of terrain.
Forts ('f'): Forts double the defensive combat rating of units garrisoned in them. Units in forts don't all die together in a stack; they die one at a time like in cities. Units in forts within three squares of a city of yours do not cause unhappiness in representative governments, see below. Forts require the Construction advance.
Airbases ('e'): These allow planes to land somewhere other than a city or aircraft carrier. They also count as a railroad and I think a fort too and they also might give some kind of production advantage in the square but in practice you don't see many of these being used.
The city of Tours, showing the characteristic Civ2 city radius outlined in white
The city is the basic functional unit of your civilization. You start the game with two settlers and they can be turned into cities (inhabit the desired square and press 'b'). The "city radius" refers to the city square itself and the twenty squares around it, basically a 5x5 square with the corners missing. You can see this more clearly with the grid on (Ctrl-g). Citizens in a given city will only be able to exploit squares within this radius.
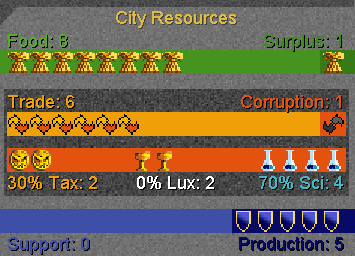
City resources
A new city will have one citizen, represented by a blue face at the top of the city screen. Below that you will see the city radius and two squares being "worked." The city square is worked for free, and your one citizen is working some other square. You can change which square he's working by clicking on that square to take him off of it, and clicking on different one to put him on.
On each turn each of your cities will be processed and the following things will happen:
Food
Each citizen eats two food per turn. The surplus food collected is added to the food box at right. If the box is full, a new citizen is added to the city. If there is a food shortage, it is taken out of the box, and if there is a shortage and no food in the box, a settler or a citizen is lost.
Shields
However many shields are collected, less unit support costs, are added to the production box at the lower right. If the box is full, whatever you were building gets built.
Trade
Each trade arrow is turned into gold, a beaker, or a luxury. This is done according to the ratio you specify with the tax slider (shift-t or "Tax Rate" in the Kingdom menu). Hence if your city collected ten trade arrows and your rates were set at 50% tax, 30% science, 20% luxuries, then five trade arrows would become gold, three would be science beakers, and two would be luxuries. Gold is added to the treasury and you use it to "rush-buy" things. Beakers accumulate until you discover whatever technology you've been researching. Luxuries make people in the city happy. Each of these may be further modified by city improvements such as marketplaces and libraries.
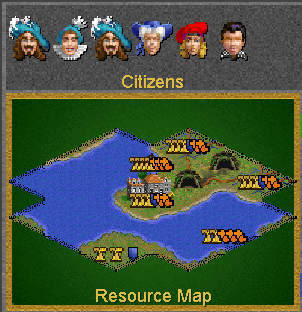
Citizens working the city radius
Each citizen lives in one of four possible happiness states:
| State | Color | Abbreviation |
|---|---|---|
| Happy | Cyan | H |
| Content | Blue | C |
| Unhappy | Red | U |
| Very Unhappy | Black | VU |
The first citizen in every city is naturally content. (After you build a certain number of cities that will stop being true, however.) The second and each thereafter starts out unhappy and you will have to do something about it, because if unhappy citizens outnumber happy citizens (yes, happy, not content), the city will go into "civil disorder," which is bad because, among other things, you stop collecting taxes and beakers from that city. (VUs start popping up when you have built a certain number of cities; they have nothing to do with the size of the city.)
The basic tools for managing happiness are:
In some governments the presence of a military unit in your city will render an unhappy citizen content. For example in Despotism and Monarchy, you can use up to three units in a city to turn up to three citizens from unhappy to content.
Some improvements render some number of unhappy people content (temple, coliseum, cathedral).
Luxuries are applied to your first citizen until he is happy, and then the second, and so on until you are out of luxuries. It takes two luxuries to take a citizen from one happiness state to the next highest; however for some reason it only takes two luxuries to move someone from VU all the way to H. The other thing about luxuries is that a given city can only use two luxuries per citizen. This link should be considered non-optional. Hence if the city is size five (has five citizens), then it can use ten luxuries; if you are producing more than that, they are wasted. Click that link for a discussion of the relevance of this rule.
Clicking the happiness button in the city screen will show you how all of this is applied in that city.
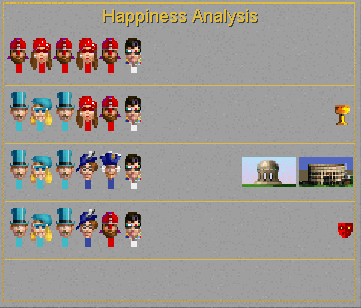
Clicking on the "Happy" button in the city screen will give you this breakdown of why your citizens are in the moods they are in
Rather than working a terrain square, your citizens can be made into one of three "specialist" types: entertainer, taxman, and scientist. They produce directly luxuries, gold, or beakers respectively. Taxmen and scientists can only be used in cities of size five or greater. To make an entertainer you just click on one of the squares being worked in your city radius in the city display. You will see that the last dude on your row of citizens is an Elvis. Clicking on him will cycle through the three kinds of specialists and you should see your gold/beakers/luxuries totals change accordingly.
In practice for most of the game it's the entertainer that matters. Pulling one citizen off of a square and then contributing two or more luxuries to the total is a way of keeping a city from going into disorder. This should be considered a stopgap solution, however. You'd rather that citizen be working a productive terrain square.
There are seven available government types. You start out in Despotism, which sucks. The characteristics of each government type can be read in the Civilopedia menu. Government change is effected through revolution (shift-r), which may be followed by a period of anarchy. Governments differ on the following points, with a few additional nuances thrown in (read about them in the Civilopedia):
Corruption and waste
Corruption eats away at your trade arrows and it is primarily related to the distance that a given city is from your capital. One of the main advantages of moving to a more advanced form of government is less corruption. Waste is the same thing, but applied to shields.
Unit and settler support
Your government type determines when you will have to start paying one shield per turn to support your military units. For example, in Monarchy the first three units are free to support, but in Republic every unit requires one shield support per turn. Also, settlers generally cost one food of support per turn but in the "representative governments," Republic and Democracy, they cost two.
Martial law and unit-based unhappiness
As seen above, under several of the government types units garrisoned in cities can help with unhappiness, each unit up to a certain number rendering one unhappy citizen happy. But in the representative governments there is no martial law effect, and, citizens are made unhappy when your units are away from your cities or forts positioned within three squares of one of your cities. In Republic the first unit away has no effect, and additional units away cause one unhappy citizen each. In Democracy the effect is two unhappy citizens for every unit away from a city or fort.
Representative government trade bonus
So far it seems like the representative governments suck. Here's where they pay off. Under Republic or Democracy, every square that produces at least one trade arrow produces an additional arrow. For example a rivered forest will normally yield one arrow if you put one of your citizens to work on it, but in these governments it will yield two.
We Love the Leader Day
We Love the Leader Day occurs in a given city when:
This is the other huge payoff of representative governments. When a city celebrates under Democracy or Republic, it will add one citizen each turn until it either stops celebrating or no longer has a food surplus. This is how one can target important cities for serious growth, and then later on in the game experience more general population booms.
In non-representative governments, WLTKD has the effect of making that city experience the representative government trade bonus. This can be put to clever use in situations when you find it undesireable or impractical to switch to Republic or Democracy. Making one or two of your privileged cities celebrate can really make your non-representative civ run better if you plan it right.
You can build units, city improvements, and "Wonders of the World." In each case they are built by adding shields to the box and possibly rush-buying them with gold. The formula for how much it costs to rush-buy is different for units than for improvements however, with the practical result being that one should never build an improvement by waiting for the box to fill up. Let it build for just one turn, so that there is at least one shield in the box, and then rush buy it. Never just let an improvement sit there accumulating shields; it's a huge waste. If you can't afford an improvement you want, then wait until you can. The one exception to this could be building temples if you have switched to Republic very early in the game.
One of the trickier things you have to get a feel for is when to rush-buy units. Sometimes this is obvious; if you need a military unit right now for a military emergency or for martial law, rushing it is an option. But depending on your gold situation and a million other factors, you are also going to want to judiciously rush-buy settlers and caravans at times.
As for improvements, think about whether they are really worth building before you build them. In a tightly played game you will see that, just like real life, some cities emerge as important and worth improving while others will stay at size three or so for most of the game. That's normal.
Settlers are used to build cities and improve terrain. They are important and you should build a lot of them to expand rapidly as the game starts. Don't improve maniacally; stop and think whether spending five turns to irrigate a square is really better at that moment than moving five squares away to found a new city. On the other hand, don't wait too long to begin a road network among your cities. Roads let you move over them for 1/3 of a move point, and they also give a trade bonus to flat squares (grassland, plains, desert). That's important.
You have to plan which cities should be building the Settlers because when you build one the city that built it loses a citizen. (If it only has one citizen, the city disappears.) This is one way to control the population of cities so they don't grow beyond your present capacity to keep all citizens content and productive. Also you will often find it useful to build settlers in bigger cities but then support them from smaller ones while they go about improving stuff. To change the home city of a unit, bring the unit to the city you wish it be supported from, and press 'h' (it is illegal and a cheat to do this with caravans).
Engineers are high tech settlers that work twice as fast and can also terraform squares. Go to the info page for each terrain type to see what the deal is with that.
Here are tables about work time for the various setter tasks. The most important information is also in the terrain info screen which you can get to just by double-clicking on a square with that terrain.
These units are for martial law and combat. In the beginning of the game a warrior really is your best, cheapest bet for controlling malcontents, and you should be one step ahead of population growth in each of your cities. More on combat later.
It has been said that if you aren't building a caravan, you had better have a good reason. In multiplayer games this principle is muted somewhat by the fact that you actually have to worry about other players coming to fuck you. (It has also been said, by me, that in multiplayer the point is not to play the tightest most perfect game of civ—it's to avoid getting fucked.)
Anyway, caravans are how you initiate trade routes. Here is way more than you need to know about trade (but do read up to 2.6.5). Trade routes are important. There are two links in this document that should be considered non-optional; this is one of them. Nevertheless, some points about trade routes:
Trade routes are established when a city builds a caravan, a supply commodity is chosen from its current supply list, and the caravan is moved to another city, foreign or domestic.
At the time of delivery whoever's caravan it was gets an immediate payment of gold. What the message that pops up doesn't tell you is, you get an equal number of research beakers applied to your current research goal.
In both the source and destination cities an ongoing source of trade arrows is established. A city can only have three trade routes at a time, but those can be replaced going forward, and there's still the delivery bonus to consider.
Clicking a foreign city tells you what it demands. There's also the "Supply and Demand" button in the F5 screen. Unless you absolutely need cash right now for some reason you should basically never deliver a caravan whose commodity is not in demand in the putative destination city.
Many factors affect the numbers here. The important thing to remember is that the delivery bonus is mostly influenced by distance and the ongoing trade bonus is not influenced by distance. In either case the total trade of both cities involved is the main factor. The main other modifiers are bonuses for deliveries between two continents, and deliveries to foreign cities. While you should almost never deliver an undemanded commodity, there's nothing wrong with trade among your own cities, especially if they are on different continents or as they get to be better (producing much more trade) than available foreign cities. Also, due to the influence of government on trade, you'd rather trade with foreign republics and democracies than other forms.
Also, caravans are how you build wonders. If a caravan enters a city that is building a wonder you will be given the option to "help build WONDER," which will add fifty shields to the wonder under construction. Obviously you can build a wonder faster with several cities contributing caravans than with just one adding its shields turn after turn. In a game where people are racing to these wonders this is necessary.
Diplomats are your best defense against barbarians because the barbarian units are cheap to bribe. You can also bribe units and cities of other civs, but in our multiplayer game city bribing is banned. Diplos cost no support and it's wise to have them on hand. They are also good for exploration and hut tipping. They can investigate foreign cities and tell you what is being built there and what units are present, etc. Note that most of these functions cause the loss of the diplomat after he's done. That doesn't happen with spies.
But one of the most important things they do is establish embassies. These are sources of vast information about the other civ. To establish one just try to enter a foreign city with your diplomat. The embassy will tell you what techs they have, the names of all their cities, what they are researching, and their diplomatic state with respect to the other civs, and how much gold they have. Embassies are necessary for planning your path through the tech tree, which will necessarily involve lots of trading and conniving.
Boats carry things to faraway places. Things like caravans, or perhaps legions. One issue with these is that the first two boats you can build, the trireme and the caravel, have non-zero attack values, which means that they count as military units away from home for the purpose of the representative government's happiness penalty. As a result it may not be practical to switch to Democracy until you can build galleons. Shakespeare's Theater is one way to deal with this problem, takes some planning though.
A technique people need to know: if you take a boat with a unit to a square with another boat that hasn't moved, you can click that square, wake up the unit, tell it to sleep again (press 's' to sleep), then select that second boat, and it will carry the unit away. That means that you can transport a unit all the way around the map on one turn, if you have enough boats lined up. This is called ship chaining and a well planned ship chain can be a great asset. It paid off big time in my last game.
You'll have to read what these do for yourself but my advice is don't build them before you need them and don't wait until after you need them. Knowing when that is is what makes good players good. Just as an example, even if you know a city has good trade specials around it and is destined for great things, if it currently is producing five gold per turn and a marketplace will turn that into seven gold per turn, you probably don't need the marketplace there yet.
Examples from a recent pretty tightly played game: In AD 140 I had about ten cities and my only improvements were temples and one barracks. By AD 400 I had built two marketplaces with eleven cities. In AD 680 a big deal was the completion of the first university in the game, in a city that I had grown to size twelve. At that time I had a total of 15 cities and most of them were size three. One was size twelve and no others were over size five. So a pattern here is that, as in real life, there is no reason to treat all your cities the same. There is nothing unusual about having one size-twelve city with one size-six and eight size-three or smaller, nor choosing one or two cities with high production to build barracks and make most of your military units.
Also remember: you rush buy all improvements as soon as there it at least one shield in the box. You do not build them with shields.
Wonders are special improvements that can only be built once and usually have some kind of civilization-wide effect. Check the civilipedia for what they do. The ones that people are going to be racing hard for are Michelangelo's Cathedral and Hanging Gardens. Which other ones will be contested depends on what's going on.
Incremental Rush-Buying refers to the manipulation of the shield box by buying a unit that costs less than the one you really want and then immediately changing the production back to what you want. When you press "buy" for the cheaper unit, the box fills with shields. When you switch back to your, e.g., caravan, the shields you just paid for remain. There are two or three reasons to do this, one of which probably strikes you as more exploitative than the others:
The formula for determining the rush-buy price is non-linear. So if you want to buy something this turn, it's cheaper to fill the box incrementally than all at once.
If you want to hurry production of something but not buy it this very turn, you can let the city add its shields and then "buy the rest of the row." So if you produce six shields a turn and are trying to buy a legion, you let the first six shields get added to the box and they buy the rest of the row by switching to warrior, buying that, and switching back to legion. Next turn the city will add another six shields, and you will by the rest of that row, etc.
If, for example, your city adds seven shields per turn and is producing caravans, then after seven turns there will be 49 shields in the box. Therefore on the next turn six shields will be wasted because you only needed one to complete the caravan. But: after 4 turns, there will be 28 shields in the box. You now have the opportunity to add two shields to the box: switch to diplomat, rush-buy, and switch back to caravan. Now instead of 22 shields to go, there are 20. Your caravan is done a turn sooner. These numbers are just an example, of course. Whatever is being built, if your city is producing six or more shields you should examine the situation for an opportunity to buy a couple of shields along the way if it will spare you a turn.
Some very brief stylized comments about combat in Civ2: stacks of units that aren't in a city or a fort (or airbase) all die together; what I mean is if a stack is attacked the best defender in the stack defends, and if it loses, all units in the stack are lost. Another thing about stacks: they can't be bribed or sabotaged.
Military units exert a "zone of control" which is hard to define precisely but the point is, units can't waltz past units of another civilization. Units spaced every other square along a line will be sufficient to stop incursions. Caravans, freights, diplomats, spies, explorers, partisans, aircraft, and ships ignore ZOC.
City walls are a big deal; they triple defense strength and even with catapults/cannon/artillery they are going to make you pay in blood to take a city. You can see if a city has walls for free just by looking at the map; the pictoral representation of the city shows walls if they are present. Also that little flag on a city shows that there is at least one unit present. In our games city bribing ("incite a revolt" with a diplomat/spy) is banned, but sabotage including sabotage of city walls is allowed. Attempts to sabotage city walls are less likely to succeed than other sabotage attempts.
Terrain matters. Hills double defense strength and rough terrain increases it by 50%. Mountains triple it.
Veteran status matters. You should be planning where to build barracks and have as many of your units as possible be built in those cities.
The unit that is most seriously used for conquest in Civ2 is the crusader. Before that, you are pretty much helpless against any walled city, and not until way later in the game will another land unit be as effective. Conquest in the post-crusader, gunpowder era is hard. But even against musketeers, crusaders are the best bet for actually taking shit over.
That said, ironclads can be pretty brutal in their era too. Naval attacks aren't affected by city walls (that's what coastal fortresses are for), and in the heyday of the ironclad the defense values of infantry units haven't gotten too high yet.
Warnings: Triremes must end their turn adjacent to the shore or they run the risk of sinking. Fighter planes must end their turn in a city or airbase. Bombers stay aloft after attacking and must be returned to a city by their next turn.
The tech you are currently researching can be seen by pressing F6. Unfortunately you see just a grapical representation and not an actual count of the beakers. Anyway when this row of beakers is full, you acquire the tech you were researching. If you acquire it some other way, you keep the beakers you'd gained thus far (there are exceptions to this). The more tech you have, the higher your research cost. This is relevant especially early on as you should not always just acquire tech for the sake of it! Especially as you rush to Monarchy, you should be wary of accepting tech trades willy-nilly, because any tech that is not a prerequisite of Monarchy will slow you down. Your tech cost is also affected by your degree of technological sophistication relative to the other civilizations. The way this is actually implemented is a little funny though; you can read about it here. Keep in mind also that when you deliver a caravan or freight, in addition to the stated gold payment, you get an equal number of science beakers.
Your first research goal should almost always be Monarchy because Despotism sucks and you want to get out of it asap. Sometimes it makes sense to skip Monarchy and go straight to Republic but if you need this introduction you shouldn't worry about that.
Trade is very important, and Map Making too, contingent of course on your having access to the sea. Bridge Building may important.
Other research goals going forward will obviously depend on circumstances but basically you do not want to have to limit the growth of important cities because you don't have the necessary tech. This is the basic tradeoff between gold and research: you need gold for improvements, but you need research to unlock those improvements. As such Construction (Aqueduct) and Sanitation (Sewer System) need to be acquired in a timely fashion and, say, University (University). Also new government types like Republic or Democracy make for important research goals. Magnetism fits in to this.
Also research goals will be determined by desirable Wonders. Typically there is a race to Monotheism because it allows one to build Michelangelo's Chapel, probably the best Wonder there is. Also, Philosophy is not only a prerequisite for Monotheism, it confers a free tech on whoever discovers it first.
The discovery, by anyone, of Invention or Navigation, puts a big penalty on caravan delivery payments. It may make sense to delay these for that reason. It may also make sense to get these, for that reason. For example, if you are playing against me, a master trader.
Understand that duplicated research is wasted research. If someone else has already discovered a given tech then your job is to avoid having to research it yourself. You can get tech from other civs by: trading your tech for it, stealing it with a diplomat or spy, conquering a foreign city.
This is more than enough information for you to cut your teeth against the AI. Go forth and conquer. I am available via email for questions and for a copy of the game and instructions for installing it in your particular circumstances, etc. Hopefully in a few weeks or months we can convene a game among us, at which point I'll add the practical procedures and rules about that.